Facebook Chat in Pidgin
Facebook stopped using XMPP awhile ago. Get FB chat back in Pidgin with the purple-facebook plugin.

Tech related posts.
Facebook stopped using XMPP awhile ago. Get FB chat back in Pidgin with the purple-facebook plugin.
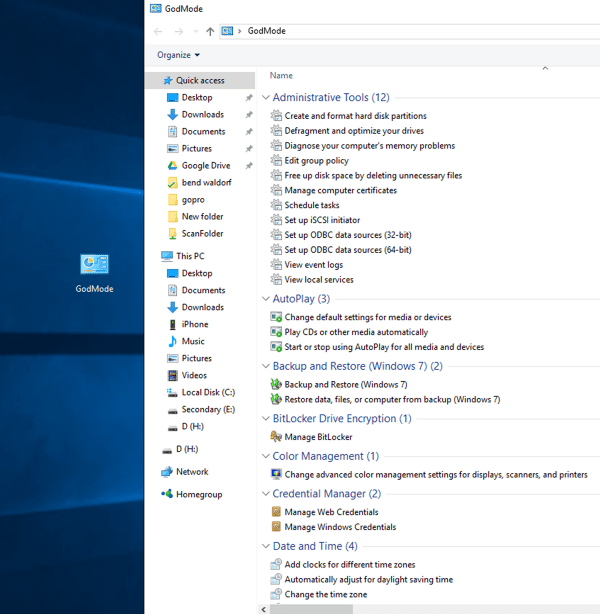
You know what’s groovy? Godmode.
In Windows 8 and 10, create a directory (anywhere, but I put it on my desktop) named
GodMode.{ED7BA470-8E54-465E-825C-99712043E01C}
In Windows 8 name it
GodMode.{ED7BA470-8E54-465E-825C-99712043E01C}
At my POE we use virtual printers for all manner of file production. It’s annoying. What’s more annoying is when it’s time to upgrade a server using virtual printers. Thankfully there’s a way to sorta kinda help the process, by sorta kinda easing the migration process. The following screenshots are from Windows 2012 R2. If you’re using a different Windows OS level your mileage may vary. It’s my understanding that the titles of some of this differs by OS.
Pi-hole is awesome, but sometimes it works too well. For instance, my wife wants to watch the recipe videos on the Food Network site, and because of embedded ad content they get pi-holed. Here’s how to whitelist domains:
First, you know that your pi-hole has a web interface, yes? Point a browser to http://[thepiholeIPaddress]/admin/index.php to get to it. From there you can check out the query log, which you’re gonna need. If you find the log all full up and cumbersome, you can empty it. Hop on your pi and, in a Terminal session, run:
1 | sudo truncate /var/log/pihole.log --size 0 |
This will zero out the query log file. Now use your browser to hit the site containing the data you want whitelisted. You’re going to want to make sure that traffic other than your own is at a minimum while you do this, or you’re going to be seeing a lot of information in the log that isn’t applicable to the browsing you are doing. Anyway, these days sites pull from a variety of domains, so you can’t just assume whitelisting the domain of the url will be sufficient. For example, to get videos to work on the Food Network site I had to whitelist assets.adobetm.com.
Once the page has finished loading check the query log. In it you’ll see both allowed domains and those that have been pi-holed. Make a list of the holed domains; you’re going to have to add them your whitelist individually and then test to find the one you’re after. To add a domain to the whitelist, open the whitelist (again in Terminal) in nano:
1 | sudo nano /etc/pihole/whitelist.txt |
Use your arrow keys to navigate to the bottom of the whitelist and then add your domain. At this time, wildcards are not supported in this list. Once you’ve added the domain, save the whitelist via ctrl+o. Then open a second Terminal session and reload your pi-hole’s settings by executing the following:
1 | /usr/local/bin/gravity.sh |
Once reloading has completed refresh the page containing the data you’re trying to whitelist. If you’ve achieved success, close your Terminal sessions (you can exit out of nano with ctrl+x) and call it a day. If not, remove from the whitelist the domain you just added and move on to the next holed domain in your list. Rinse and repeat until you see what you’re looking for.
Some people seem to like using the Whitelist Assistant Chrome extension when doing this. I find pi-hole’s query log to be absolutely sufficient.
Despite supposedly having no data caps, the other day my provider interrupted my surfing with a message stating that I’d downloaded an “excessive amount” and should contact them to upgrade my plan. Interestingly, their website also doesn’t show any data caps or, for that matter, any plans for me to upgrade to.
I’m not real worried about it, but at the same time since I work full time remote I really need my intertoobs to work all the time. Then I remembered that the vacation rental we manage next door to me has internet that rarely gets used. Time to slap a wireless NIC on the server and push internet traffic through that router!
Doing so was easy. I had a halfway decent USB wireless laying around. I slapped it in, joined the next door wireless network, and then ran a route print:
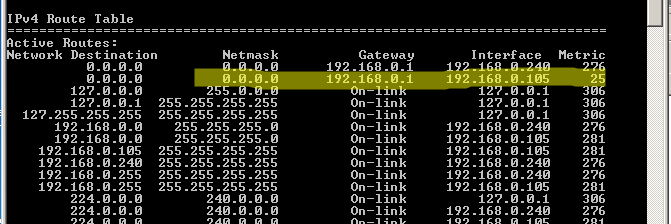
The highlighted bit is the new NIC. Above it is the wired NIC connecting the server to my local network. You want the Metric on the NIC you want internet traffic flowing through to be the lowest. Luckily mine defaulted to that. If yours doesn’t do that you can manually set the Metric by navigating to the Advanced properties of the Network Adapters:
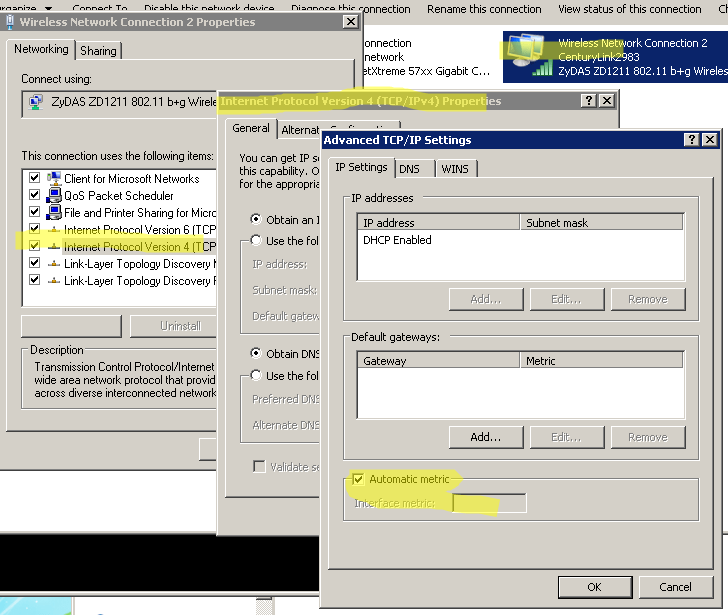
After that I simply removed the Gateway address from the properties of my wired LAN access NIC and voila – all my intertoobs were coming from next door while my LAN still had full access to my server. In order to double check I logged into my router and disabled internet traffic for the server IP address.
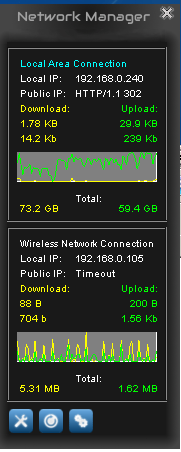
I also installed a groovy little tool called Network Manager so I can watch the traffic:
I admit it – I use Windows Sticky Notes. I hate how unconfigurable it feels though. The font is terrible, for instance. Lucky you can change it with a reghack.
|
1 2 3 4 5 |
REGEDIT4 [HKEY_LOCAL_MACHINE\SOFTWARE\Microsoft\Windows NT\CurrentVersion\Fonts] "Segoe Print (TrueType)"="consola.ttf" "Segoe Print Bold (TrueType)"="consolab.ttf" |
What’s happening here is, because the notes demand to use Segoe Print as the font, you’re changing what font Segoe Print actually is. Replace the .ttfs with fonts of your choice.
There are also a myriad of shortcuts for modifying existing note text:
Ctrl+B – Bold text
Ctrl+I – Italic text
Ctrl+T – Strikethrough
Ctrl+U – Underlined text
Ctrl+Shift+L – Bulleted (press once) or Numbered (press twice) list
Ctrl+Shift+> – Increased text size
Ctrl+Shift+< – Decreased text size
Ctrl+A – Select all
Ctrl+Shift+A – Toggles all caps
Ctrl+L – Left aligns text
Ctrl+R – Right aligns text
Ctrl+E – Centers text
Ctrl+Shift+L – Small Alpha list (3rd), Capital Alpha list (4th), small roman (5th), Capital roman (6th)
Ctrl+1 – Single-space lines
Ctrl+2 – Double-space lines
Ctrl+5 – Set 1.5-line spacing
Ctrl+= – Subscript
Ctrl+Shift++ – Superscript
For reasons I won’t get into here, the EFF has decided for now not to support Pale Moon, which is my current browser of choice (sideplug: Like Firefox but tired of it gobbling all your resources and crashing? Pale Moon my friend). The inability to install HTTPS Everywhere nearly had me leaving Pale Moon until I discovered that there’s a fork of it out there that works! So use Pale Moon, and install Encrypted Web (and uBlock Origin).
I’ve read some pro-capitalist (anti-socialist?) rants lately, some penned by people roughly half my age, that have disappointed me in their shortsightedness. I’ve also read some writings by people like Stephen Hawking – who recently said we should not fear artificial intelligence, but rather capitalism – and a raft of economists, technologists and anthropologists – who are predicting a near future of technologically driven job scarcity – that lend credence to my disappointment. You don’t have to like it, but you’d be a fool to ignore it: we’re on the precipice of a future with a very different economic landscape, and more likely than not – especially if you’re young – you’re going to be in big fucking trouble if your value system doesn’t change, and fast.
Trust me. I know. Because, on a very small scale, I’m one of those people making you obsolete. Continue reading
I’m using some older Windows programs – abandonware stuff by this point – on Ubuntu Mate via Wine. I needed to install some custom fonts for these programs to use and had a bit of a time finding straightforward instructions on doing so. Turns out it’s easy. The fonts I needed are TrueType, so that’s all I’ve tested with.
Navigate to home/YOURUSERHOME/.wine/drive_c/windows/fonts
You will have to enable hidden files in order to see the .wine directory, and if you haven’t done so already you’ll need to open the fonts directory as administrator (from the windows directory right click the fonts directory and choose Open as Administrator). Dump your font(s) into that directory. Then open a prompt and enter:
sudo fc-cache -fv
This will rebuild the font information caches for fontconfig system. Then you should be good to go.
“Some index files failed to download.” That’s the error I got upon running apt-get update, after having Ubuntu Mate notify me that some of my updates are, er, out of date. The indexes that failed to download were related to Flux, which I really liked having on my Windows machines. Turns out that, as of this writing, the repository of Vivid Vervet (Ubuntu 15) for Flux ain’t there. Take a look for yourself and see. I suppose I could install an older version, but since I wasn’t interested in getting into any compatibility issues I decided to bail on Flux for now.
But I couldn’t uninstall Flux. It isn’t installed. I need to get rid of the repository information. You’d think that would be as simple as remove-apt-repository blah blah, since adding it is a simple add-apt-repository, but nope. There’s no remove-apt-repository. Ultimately I opened the path /etc/apt/sources.list.d as admin, and removed the associated list and save files. Reran apt-get update and voila – both the errors and the nag referring to out of date updates disappeared.
