Category: Freelance

Freelance work related.

RW Elephant Inventory WordPress Plugin and Divi

This is an obscure one. I have a client that uses this combination for their business. RW Elephant put out their new plugin v2x rather than update their old v1x plugin, and it’s basically like starting over. Honestly, configuration worked pretty well, but there were some problems. Firstly, it defaulted to full browser width on its primary inventory screens, which looked like poop. This was fixed by heading to their rw-elephant.min.css in wp-content\plugins\rw-elephant-retail-inventory\lib\assets\css and changing the .rwe-inventory margin setting to auto and width to 80% in order to shrink and align the inventory content.

Continue reading

ZyXEL C1000Z Scheduled Reboot – Windows

So there’s nowhere in its OS to schedule a reboot of ZyXEL’s C1000Z router.  Thankfully you can use Telnet to do it.

First, enable Telnet.  Log into the router, then choose Advanced Setup > Remote Console.  Under Console State choose LAN Telnet Enabled.  Set your Telnet username and password and click Apply.

Now you’re ready to go.  Create a .vbs file and populate it with the below, changing the IP address, username and password to be applicable to your router.

1
2
3
4
5
6
7
8
9
10
11
12
13
14
15
16
17
Option explicit
Dim oShell
set oShell= Wscript.CreateObject("WScript.Shell")
oShell.Run "telnet"
WScript.Sleep 3000
oShell.Sendkeys "open 192.168.1.1~"
WScript.Sleep 3000
oShell.Sendkeys "admin~"
WScript.Sleep 3000
oShell.Sendkeys "password~"
WScript.Sleep 3000
oShell.Sendkeys "reboot~"
WScript.Sleep 3000
oShell.Sendkeys "~"
WScript.Sleep 3000
oShell.Sendkeys "quit~"
Wscript.Quit

Save this file.  You can double click it to test it.  After having confirmed it works, create a task pointed to it in Windows Task Scheduler.  Modern Windows OSes should natively run a vb script in scheduler.  If not, use CScript to launch the script:

1
C:\Windows\System32\CScript.exe //Nologo //B X:\PathToYourScript\YourScript.vbs

Switching DNS – Windows

I use the mighty Pi-Hole to streamline my browsing experience.  Sometimes, though, the ole Hole can get in my way, blocking something I need to see.  If it’s a one time deal, and not something I want to whitelist (which Pi-Hole has thankfully made easy to do via the web interface as of the latest edition), I wanted an easy way to temporarily switch DNS servers.

Enter QuickSetDNS, a groovy little exe that can do just that. Download QuickSetDNS and unpack it into the destination of your choosing.  There’s no installer – it’s a simple standalone exe.  Fire it up, right click in the whitespace and create a new DNS server entry. I’ve got one for my Hole, and one that points to Google’s public DNS servers.

After creating your entries, right click on one and choose Copy SetDNS Command Line. Then right click on your desktop and create a new shortcut.  Paste the SetDNS command line in for the location of the shortcut and click Next.  Name it something informative, and save it.  Do the same with your other DNS entries in QuickSetDNS.

There.  Now you have shortcuts you can double click to change your local DNS settings.

pi-hole – Whitelisting Domains

Pi-hole is awesome, but sometimes it works too well.  For instance, my wife wants to watch the recipe videos on the Food Network site, and because of embedded ad content they get pi-holed.  Here’s how to whitelist domains:

First, you know that your pi-hole has a web interface, yes?  Point a browser to http://[thepiholeIPaddress]/admin/index.php to get to it.  From there you can check out the query log, which you’re gonna need.  If you find the log all full up and cumbersome, you can empty it.  Hop on your pi and, in a Terminal session, run:

1
sudo truncate /var/log/pihole.log --size 0

This will zero out the query log file.  Now use your browser to hit the site containing the data you want whitelisted.  You’re going to want to make sure that traffic other than your own is at a minimum while you do this, or you’re going to be seeing a lot of information in the log that isn’t applicable to the browsing you are doing.  Anyway, these days sites pull from a variety of domains, so you can’t just assume whitelisting the domain of the url will be sufficient.  For example, to get videos to work on the Food Network site I had to whitelist assets.adobetm.com.

Once the page has finished loading check the query log.  In it you’ll see both allowed domains and those that have been pi-holed.  Make a list of the holed domains; you’re going to have to add them your whitelist individually and then test to find the one you’re after.  To add a domain to the whitelist, open the whitelist (again in Terminal) in nano:

1
sudo nano /etc/pihole/whitelist.txt

Use your arrow keys to navigate to the bottom of the whitelist and then add your domain.  At this time, wildcards are not supported in this list.  Once you’ve added the domain, save the whitelist via ctrl+o.  Then open a second Terminal session and reload your pi-hole’s settings by executing the following:

1
/usr/local/bin/gravity.sh

Once reloading has completed refresh the page containing the data you’re trying to whitelist.  If you’ve achieved success, close your Terminal sessions (you can exit out of nano with ctrl+x) and call it a day.  If not, remove from the whitelist the domain you just added and move on to the next holed domain in your list.  Rinse and repeat until you see what you’re looking for.

Some people seem to like using the Whitelist Assistant Chrome extension when doing this.  I find pi-hole’s query log to be absolutely sufficient.


Windows 7 with 2 NICs

Despite supposedly having no data caps, the other day my provider interrupted my surfing with a message stating that I’d downloaded an “excessive amount” and should contact them to upgrade my plan.  Interestingly, their website also doesn’t show any data caps or, for that matter, any plans for me to upgrade to.

I’m not real worried about it, but at the same time since I work full time remote I really need my intertoobs to work all the time.  Then I remembered that the vacation rental we manage next door to me has internet that rarely gets used.  Time to slap a wireless NIC on the server and push internet traffic through that router!

Doing so was easy.  I had a halfway decent USB wireless laying around.  I slapped it in, joined the next door wireless network, and then ran a route print:

Selection_009

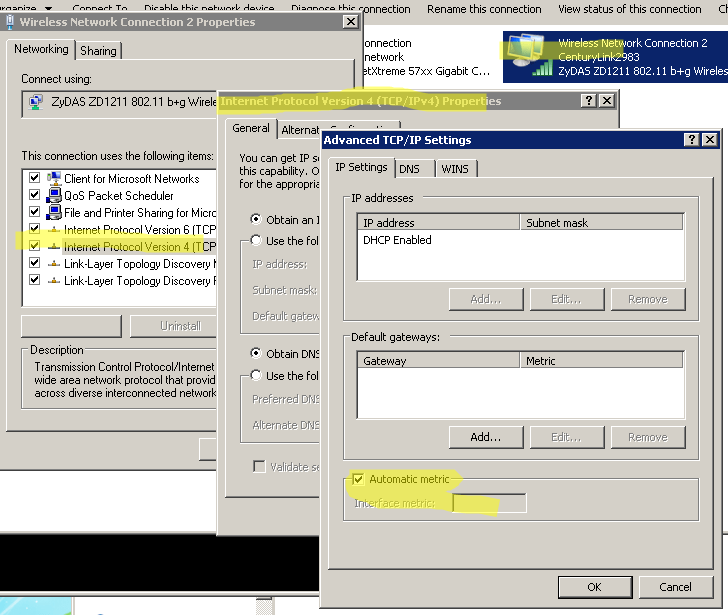
The highlighted bit is the new NIC.  Above it is the wired NIC connecting the server to my local network.  You want the Metric on the NIC you want internet traffic flowing through to be the lowest.  Luckily mine defaulted to that.  If yours doesn’t do that you can manually set the Metric by navigating to the Advanced properties of the Network Adapters:

Selection_010

After that I simply removed the Gateway address from the properties of my wired LAN access NIC and voila – all my intertoobs were coming from next door while my LAN still had full access to my server.  In order to double check I logged into my router and disabled internet traffic for the server IP address.

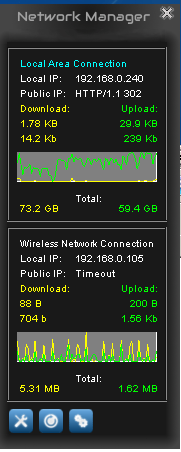
I also installed a groovy little tool called Network Manager so I can watch the traffic:

Selection_011


Fonts For Wine in Ubuntu Mate

I’m using some older Windows programs – abandonware stuff by this point – on Ubuntu Mate via Wine.  I needed to install some custom fonts for these programs to use and had a bit of a time finding straightforward instructions on doing so.  Turns out it’s easy.  The fonts I needed are TrueType, so that’s all I’ve tested with.

Navigate to home/YOURUSERHOME/.wine/drive_c/windows/fonts

You will have to enable hidden files in order to see the .wine directory, and if you haven’t done so already you’ll need to open the fonts directory as administrator (from the windows directory right click the fonts directory and choose Open as Administrator).  Dump your font(s) into that directory.  Then open a prompt and enter:

sudo fc-cache -fv

This will rebuild the font information caches for fontconfig system.  Then you should be good to go.

some index files failed to download – Linux

“Some index files failed to download.”  That’s the error I got upon running apt-get update, after having Ubuntu Mate notify me that some of my updates are, er, out of date.  The indexes that failed to download were related to Flux, which I really liked having on my Windows machines.  Turns out that, as of this writing, the repository of Vivid Vervet (Ubuntu 15) for Flux ain’t there.  Take a look for yourself and see.  I suppose I could install an older version, but since I wasn’t interested in getting into any compatibility issues I decided to bail on Flux for now.

But I couldn’t uninstall Flux.  It isn’t installed.  I need to get rid of the repository information.  You’d think that would be as simple as remove-apt-repository blah blah, since adding it is a simple add-apt-repository, but nope.  There’s no remove-apt-repository.  Ultimately I opened the path /etc/apt/sources.list.d as admin, and removed the associated list and save files.  Reran apt-get update and voila – both the errors and the nag referring to out of date updates disappeared.

More info on Microsoft’s push to track Windows 7 and 8 users

Surely you’ve already read that Windows 10 includes some pretty disappointing user tracking baked into it.  Microsoft is also pushing this tracking down to its Windows 7 and 8 operating systems.

Aside:  I get the Win 10 thing.  It’s free.  Do what you want with your free operating system.  But quietly inserting anti-privacy shit into operating systems that people have already paid for?  Ludicrous.  Offensive.  Ridiculous.  It’s prompted me to finally get off my ass and move all the machines I can off of Windows and onto Linux, for good.

Anyway, yeah, MS is pushing this stuff into your operating system without really giving you any indication.  The current list of updates that should trouble you are as follows:

You can remove these updates via command line thusly:

In fact, you can save the above to a .bat file and run it.  This takes them off, but unfortunately doesn’t prevent them from presenting themselves for install in the future.  To fix that you’ll have to head to Windows Update, let it scan what you’re missing, and then go through that list hunting for each of these.  When you come across one, right click it and choose to hide it.

This is the list for now… I sincerely doubt this is where it will end, however.  Have you tried Linux lately?

Virtualbox and Ubuntu (MATE)

I might be bailing from Windows, but I still need it for work.  Luckily I’ve been using Virtualbox for my work machine (for a variety of reasons I won’t get into here).  However, I installed Vbox 5.02 on my Ubuntu MATE laptop, imported my virtual machine, and upon first run was greeted with:

Kernel driver not installed (rc=-1908)

The VirtualBox Linux kernel driver (vboxdrv) is either not loaded or there is a permission problem with /dev/vboxdrv. Please reinstall the kernel module by executing

‘/etc/init.d/vboxdrv setup’

as root. Users of Ubuntu, Fedora or Mandriva should install the DKMS package first. This package keeps track of Linux kernel changes and recompiles the vboxdrv kernel module if necessary.

I tried what the error said, but no dice.  It could not recompile the vboxdrv kernel module.  After a bit of searching around I found the following solution: